Recycle and re purpose the hundreds of toilet paper rolls you go through. For these projects, I actually used wrapping paper rolls and just cut them all to about 5in.
The first thing you do is glue on some pretty paper.

I used both Mod Podge and spray adhesive. I found that the mod podge worked alot better at keeping the paper glued. Measure around the tube and also the length. I added about 1/2 inch to the circumference so that it would overlap. You could even use pretty contact paper.
Use #1: Keep all those extension cords and small cables organized!

We have a ton that we use for Christmas and my husband has a cable for everything but they aren't always being used. Before, they were all tangled in a plastic bag. Luke ALWAYS ended up frustrated looking for his cables. Now, they're all right there. Now, for the men, they probably don't need, okay,
definitely don't need the pretty paper. Buy hey, who's the one making them? So who has creative freedom? That's right, we do!
Use #2: Party favors or simple gifts. I did these for Valentine's Day for my neighbors.

After you glue the paper on, fold the ends in, one side at a time. I know that sounds confusing so here's a picture.
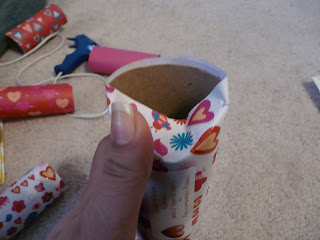
Inside I put some Hershey's kisses but you could put any kind of candy or treat that fits.

I also put these Bible verses inside.
"And this is love--not that we loved God, but that he loved us and sent his Son as a sacrifice to take away our sins. We love because he first loved us." 1 John 4:10,19
My purpose for making these was to remind people of what true love is. It's not a feeling and it's not something that we can go looking for in a person on one day where gifts of love are expected. It's the love of Jesus, and in Him, we can experience true love everyday! After you've filled it, fold the other ends in as well. I also put a sticker on the front to tell who it's from and the address of our house (we're still pretty new to the neighborhood).

Then, my family and I went to deliver them to our neighbor's mailboxes. I know, I know, we should've knocked on the door, but I'm still a little intimidated. Pray for me!
Anywho, the possibilities for #2 are really endless. Think about theme parties, birthday parties, party favors, wedding favors... I could keep going. And more importantly, CHEAP!!! or I mean,
inexpensive.

 Poor The Boy. Bad The Mom. I can't believe I let it get this bad. But, don't worry, I've fixed it. I know you're all thinking that I bought one of those plastic thingys, but i didn't. Because why buy when you can MAKE!!! I have ALOT of left over fabric from when Isaac's grandmother made him his bumpers so I decided to use that, some white muslin, and some batting. I also sewed in some ribbon to tie it onto the crib. Measured, cut and sewed, and voila!
  And it looks nicer than the plastic cover. Plus you would have still seen the chucked up wood. Now all you see is nothing. Unfortunately, Isaac's found another spot to start chewing on, so I'll be making another one of these soon! I'm glad Isaac's gotten the most use out of this crib before his little brother or sister starts using it!


